Creative Reflection Technique: Everyone Wins When Students Map their Learning
Inside: A meaningful end-of-year reflection technique for older students that combines the power of student-led learning with brain-based associations…
Ever wish you could just find a rainbow that will lead you all the way to a real pot of gold? If we’re speaking in metaphors, you may be in luck. When it comes to teaching and learning, we all want students to “do the work.” Yes, they should be taking charge of their learning! But…how?
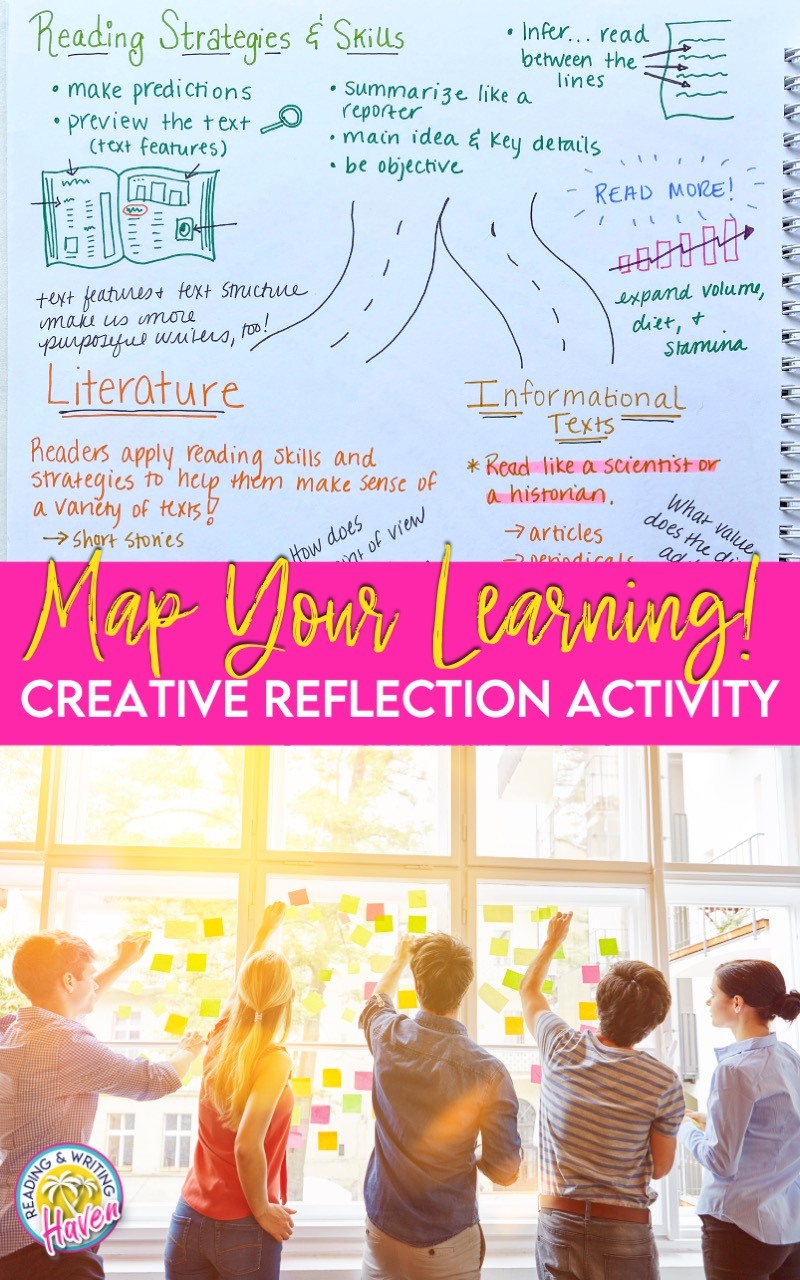
Year mapping is a powerful reflection technique that highlights a whole slew of power-house education skills.
- collaboration
- critical thinking
- connections
- creativity
- evaluation
- reflection
- synthesis
So, if you’re in search of creative reflection techniques where students are driving the critical thinking bus, you’ll want all the year mapping details: What? Why? How? In this post, we’re going to dive in!
If you find that you are ready to start playing with this activity but are short on time to prep, you can find my starter kit here.
WHAT IS YEAR MAPPING?
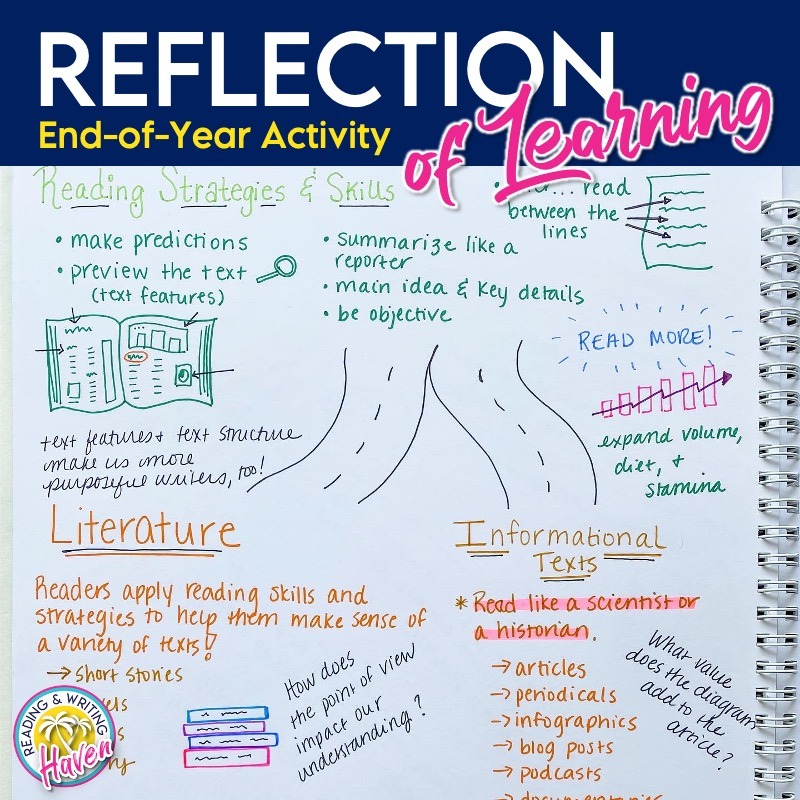
Year mapping is a blissful mixture of some things you probably already know about! Imagine a combination of one pagers, sketchnotes, and concept maps…without the limitation of a single page. I first learned about the general concept of year mapping from brain-based teaching experts Donna Wilson and Marcus Conyers who share that the practice helps students to see and celebrate what they’re learned in your class.
Intrigued, I set to work with figuring out what year mapping means to me and creating scaffolding materials I felt students may need to get started. In doing so, my brain was swirling with inspiration and ideas, and I started to well up with excitement. Done well, I thought, this could really be a reflection game changer!
For me, year mapping is an activity that requires students to reflect on everything they have learned in the class! Students work with peers or individually to identify big takeaways, key learning points, and make connections between overarching topics of the class. (You can choose the topics, students can pick, or you can select some together.)
WHY HAVE STUDENTS MAP THEIR LEARNING?
Ever wonder if your teaching is clear? If you are curious whether students can make connections between units or learning standards, this creative reflection activity will give you valuable feedback to analyze.
For instance, can students explain the relationship between reading like writer and writing like a reader? Can they draw parallels between sentence structure and pacing techniques? Do they see how language elements and vocabulary impact an author’s style?
As students map their connections, they solidify their understanding of concepts, unearth the magic of how all parts of the course are interconnected, and even extend learning to life outside of school. (Ex. – Why is the writing process an important workplace skill?)
Due to the open-ended nature of this end of year activity, there are many access points for students of all readiness levels. That means it’s allows for efficient and practical differentiation! Plus, it really can be adapted to any occasion and format.
Another fabulous detail? YOU, the teacher, are free to confer with students, coach them through their review session, and fill in learning gaps where necessary.
Look how much brain-based connections are emphasized with this reflection technique!
HOW IT WORKS
Learning maps are visual representations of learning. When we ask students to create maps of their learning, we are, to some degree, putting them in the shoes of the teacher.
Think about it. What do you do when you sit down at the beginning of the year with your curriculum? Most likely…identify learning standards, group them into lessons or units that are related in content, and figure out how to draw connections between them. Part of this process is scaffolding skills. We teach parts of speech before sentence structure, and we teach story elements before theme. They are building blocks.
This is higher-level thinking!
Once students have the “topics” they will map, they go through a very similar process. Except…theirs is a reflective activity toward the end of the semester or year instead of a planning session at the beginning.
Students truly get to be creative because they really can arrange the topics on their “maps” in any way they desire, as long as they can show meaningful connections.
Think…spokes on a wheel, threads on a spider web, stops on a highway, or rungs of a ladder. Some may choose to use a line graph for their year, showing the points where writing, reading, grammar, and vocabulary intersected for them. Others may opt for books on a shelf and group them by genres that represent standards. What about a treasure map that moves from Unit 1 all the way to the final Unit? X marks the spot!
Creative thinkers will latch on to the visual aspect of the brainstorming stage. Working with partners and using graphic organizers can help to make the process less abstract for students.
INTRODUCING YEAR MAPS TO STUDENTS
First, students should identify the knowledge, skills, and big ideas they should include in their maps.
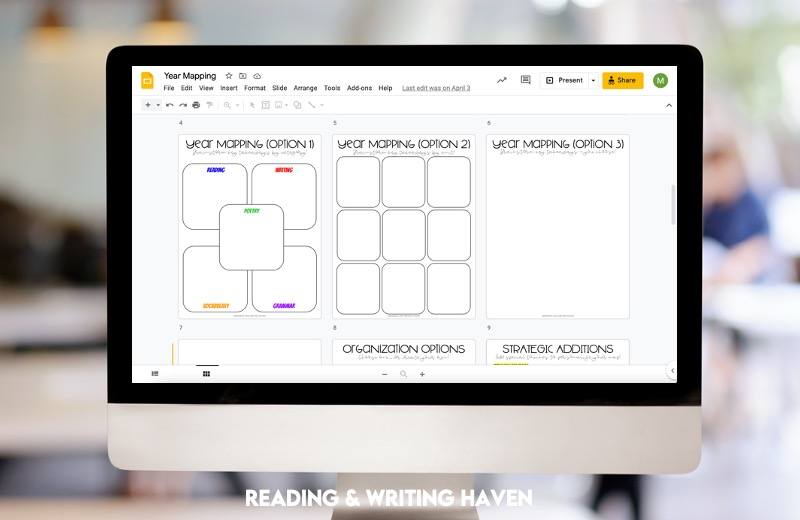
Once your students have identified their topics, they’ll be staring at…a blank paper. To complete year mapping, students really can use any medium they want. Consider some of the possibilities:
- an infographic
- a colorful mural
- a set of linked Slides where the first slide links them all together
- a physical road map on two sheets of paper – (I have found only one 8.5 x 11 is not enough room)
Regardless of the final product, I recommend having students do some brainstorming. You may want to give them directions, like this:
Organize categories…
Use the blank paper or sticky notes in front of you to begin thinking about how each of your topics is related to others on the list. It would be helpful to first create some categories. One example would be to organize topics by unit. What learning targets did we accomplish during our short story unit? Many of you probably recall we worked on analyzing story elements. In one category, you may include strategies for analyzing characterization, plot, and setting. (It may help to brainstorm some possibilities together on the board.)
Make connections…
You have all demonstrated that you can analyze a short story and identify the theme, but now I want to see your creativity at work! As you reflect on what you have learned this school year, try to map as many connections as possible between learning targets within and across units of study. How does grammar help us write? How does being an observant reader help us with writing? Can analyzing story elements help us to be strong writers? You can use the graphic organizers to help you put ideas together. This will be your brain on paper!
Choose your format…
Once you have a basic idea of how you want to proceed, you’ll want to choose your medium. Would it make most sense to represent your learning digitally or on paper? What size or how many pages would be appropriate to show a vast spread of learning? (Discuss the advantages and limitations of each.)
Remember your goal…
Your goal? Reflect on your year of learning and make as many powerful associations between lessons as possible! Show me what you know! Don’t forget to make revisions frequently! Add, subtract, combine, and simplify until you are happy.
There’s so much opportunity for students to use as much or as little scaffolding as possible with year mapping. Students who are ready for a challenge can push themselves to make more symbolic, higher-level connections, while students who need scaffolding can use graphic organizers to help them visualize where to put information.
EXAMPLES
So let’s consider what each step of this reflection technique might look like in the classroom.
Students find brainstorming pages helpful for pre-mapping. However, one size doesn’t usually fit all. So, you can offer some options and have students pick the one that fits their categories best. I like to provide a couple of basic graphic organizers because it helps students to understand what I mean by “categories” of learning. Offering a blank option is convenient for abstract thinkers.
Next, students organize their ideas into a more purposeful arrangement. You can show them a variety of options, and let those be springboards for creativity. You can provide organizers or have students spend some time researching flow chart style organization for inspiration. Sticky notes work, too!
Encourage students to think about how they can show connections between important ideas and emphasize learning. Students can add arrows, shapes, and colors. This is usually one of the biggest coaching opportunities as you confer with students. Once students grasp the idea of how to categorize their learning, we can encourage them to get out of the “silo” mode. Those categories are connected to the larger picture…how?
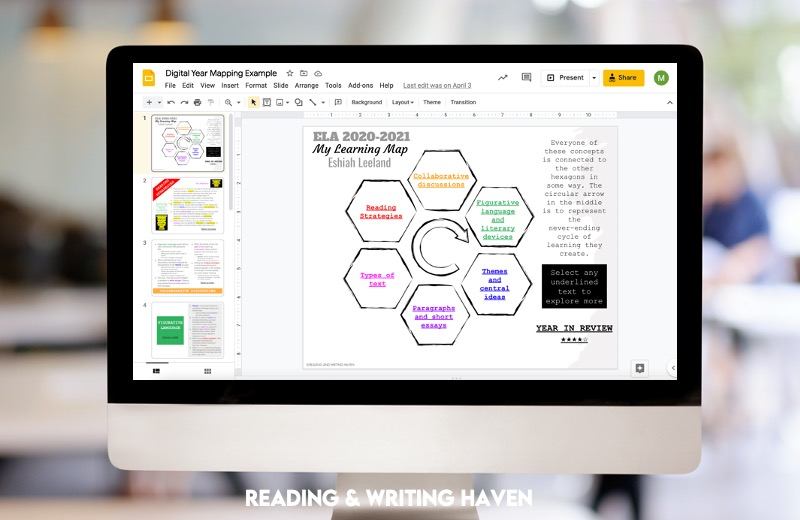
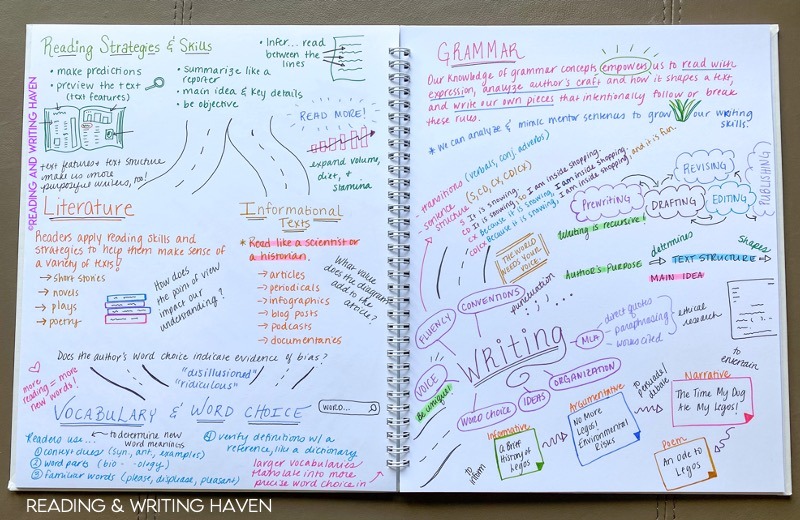
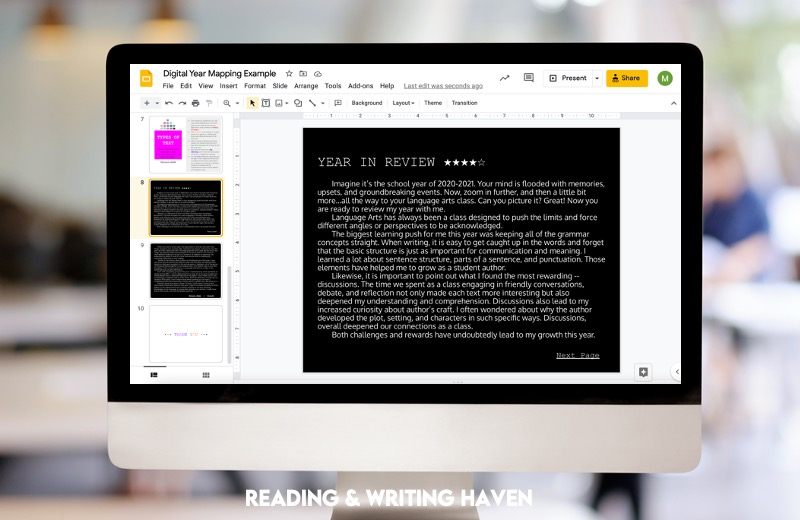
Year maps can be digital (like the examples pictured above), or they can be print (my personal favorite!). It really doesn’t hurt to give students the choice if you have the means for them to complete the creative reflection either way.
When students complete year maps digitally or on paper, it’s important to stress that typically more than one page or one slide is needed to truly be comprehensive.
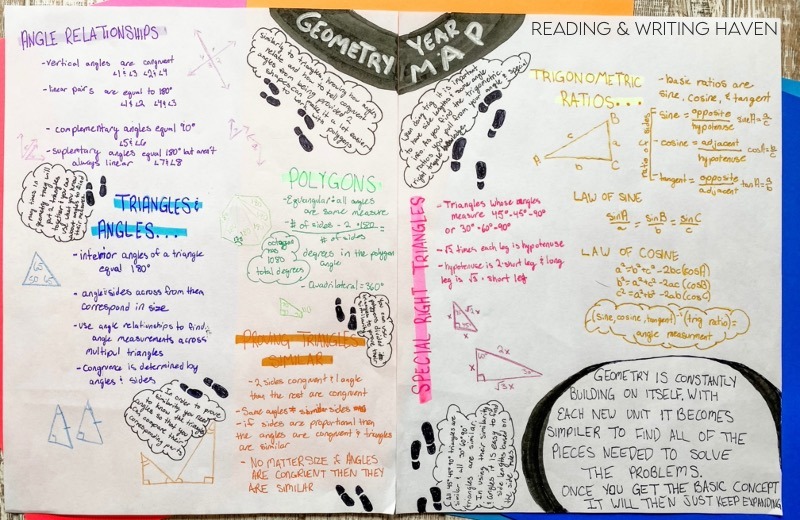
While the examples pictured so far have been for English Language Arts, this reflection technique really can be powerful in any subject area. See the example below, which was created by a ninth-grade math student.
FOR BEST RESULTS, ADD WRITING
You may find that adding a writing reflection deepens students’ thought process. Students can reflect on the effort they put into the class, on the parts of the course that were most rewarding and challenging, and on their contribution to the greater body of learning.
By including a writing component, students are encouraged to articulate the connections they made as well as identify areas where they could grow more. Naturally, this reflection process can lead to goal setting.
Set students up for productive written reflection by crafting questions that will lead them toward evaluating their learning and their work ethic. A thoughtfully designed written component has the potential to lead students to their best thinking.
For this reflection technique, I do provide content suggestions with a rubric, but I’m often pleasantly surprised with what students come up with on their own!
The reflective writing assignment should not lead to mounds of grading! Yes, students should always strive to be producing their best quality work, but for this assignment, I only recommend assessing ideas (if anything).
OTHER CONSIDERATIONS
Collaborating
If possible, working together on year mapping will provide more perspectives and associations, deepening the creative reflection process. From the brainstorming step to categorizing and emphasizing key ideas, students push one another’s thinking to new spaces.
Evaluating
Before asking students to create a map of their year, it may be helpful to show them some examples and ask them to evaluate the strengths and limitations of each.
Do the examples show clarity of ideas? Are the connections strong? Does the creator include enough high-quality examples and inter-lesson connections?
Having students walk through this evaluation process will make them more cognizant of the depth of their own thinking.
Experimenting
Like one pagers, hexagonal thinking, mind maps, and any other assignment that feels abstract and fuzzy at the outset, we as teachers will be able to lead our students through the process more effectively if we complete the work first! Before trying this reflection technique with students, I experimented with year mapping myself. In doing so, I realized I didn’t like what I came up with first.
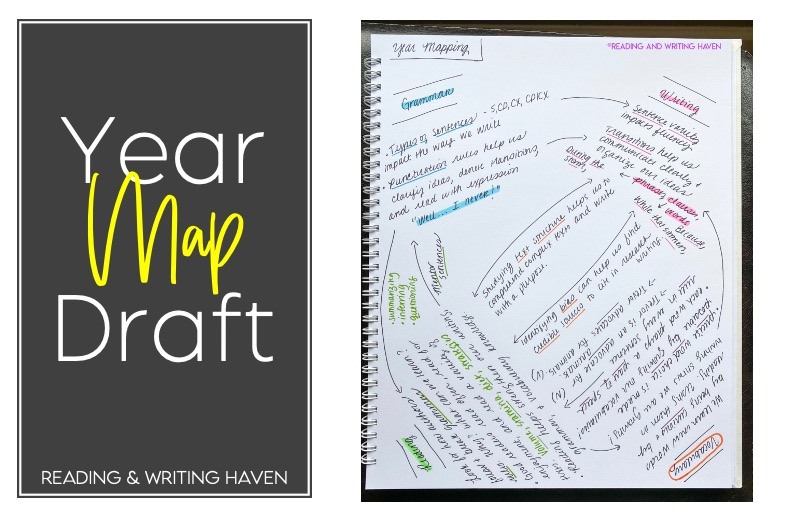 It was kind of shallow and much too brief to represent a year of learning. Realizing I wanted students to dig deeper, I went back to the drawing board and expanded my thinking onto two pages instead of one. I included more specific examples and cleaned up the organization. Adding color coding, visuals, and arrows pushed me to think more deeply about the connections between the topics I had selected. (You can see my finished version toward the top of this post.)
ASSESSING THE MAPS
Year mapping can be as low-key or as formal as you’d like. If you’re looking for a meaningful, creative reflection technique to prepare students for final exams, you probably don’t need to assess them. Likewise, if you just want a window into students’ learning from the year…(Did they make the connections you wanted them to? Have they really reached deep thinking about the standards? Where might lessons have not been as effective as possible?)…you probably don’t need to grade them.
However, if you’re using the year maps as a culminating project, I recommend using a rubric. You can identify categories and create proficiency scales with students, or you can define the success criteria yourself and discuss them with students while evaluating examples.
For the best results, coaching students throughout the planning, drafting, and revising process is the most valuable feedback you can provide them in terms of assessment. As you encourage them to make connections they haven’t, think deeper, and clarify ideas, students will have time to adjust and do the work they hadn’t yet completed.
SHARING THE MAPS
Of course, one of the best ways to finish year mapping is to share the maps! Celebrate learning by having students display their maps or share highlights (favorite parts, most challenging learning experiences, and etcetera). Depending on your time constraints, this can be formal or a gallery walk style in which students have their work displayed, and peers walk around, leaving feedback. (Praises, questions, and ideas are helpful ways to guide peer to peer feedback.)
Year mapping is the perfect end of the year activity for reflection and review! Of course, you can use this same concept at the end of a unit to make connections between smaller time segments as well. Students can complete this activity in any amount of time, but the less time they have, the fewer connections they will make.
When students map their learning, everyone wins. Collaboration, critical thinking, and brain-based learning take center stage with this end-of-year reflection technique. End the school year meaningfully with learning maps!
STUDENT TESTIMONIAL:
“It was a great way to mentally assess the year. It not only helped me reflect on my own performance as a student but also helped me review the different topics that we studied throughout the year. When I was creating my map, I was unintentionally giving myself a brief refresher course that I will remember long after the individual lessons are forgotten. It was helpful to recap my ninth-grade learning before moving on to tenth grade. I know I will need these skills! This was a fresh way to remember the year and connect all of the dots in ways that I wouldn’t have noticed before.”
– Elise, Freshman
RELATED RESOURCE:
If you are loving this reflection technique but don’t have the time to to put the scaffolding together, this starter kit will help you make it happen.