Modeling with Graphic Organizers: A Surefire Way to Increase Learning
Inside this Post: If your experience with graphic organizers has been less than enchanting, stick around. This post has simple, specific suggestions for modeling with graphic organizers to increase learning! (I’ll also be speaking about this topic at a free professional development session this summer. Claim your seat here!)
Picture this: You step into your classroom filled with eager middle or high school students, ready for today’s lesson on a challenging topic. You are determined to help your students truly understand and engage with the material. You hand out the graphic organizer you thoughtfully crafted the night before, expecting a breakthrough in comprehension and critical thinking!
But as the bell rings to signal the end of class, your students hand in their completed organizers at the door, and your heart drops! Despite your best intentions, you’re looking at one-word responses and a lack of genuine engagement. This scenario is both common and frustrating, sometimes leaving teachers feeling unsure of how to make graphic organizers most useful.
A Shift in Graphic Organizers
You probably use traditional graphic organizers, such as Venn diagrams, concept maps, and timelines regularly to enhance learning. However, recently educators have seen a shift towards more creative and personalized options. These newer formats empower students to engage with the material in a more unique and meaningful way, encouraging critical thinking and creativity.
If you want students to develop strong comprehension and analytical skills while actively engaging with their learning, graphic organizers are the way to go. By visually organizing information, students can identify relationships between concepts, recognize patterns, and develop a deeper understanding of the subject matter. These visual aids also help students retain their learning and make it easier to retrieve and recall information.
Benefits of Graphic Organizers
One of the best things about graphic organizers is their versatility. With reading, graphic organizers can be used for note-taking to summarize thoughts, capture key points, and organize information from textbooks or research materials. Students can use graphic organizers to brainstorm ideas, outline essays, and structure their writing. And of course, one of my favorite ways graphic organizers can help students is to understand relationships between words, identify synonyms and antonyms, and develop a rich vocabulary.
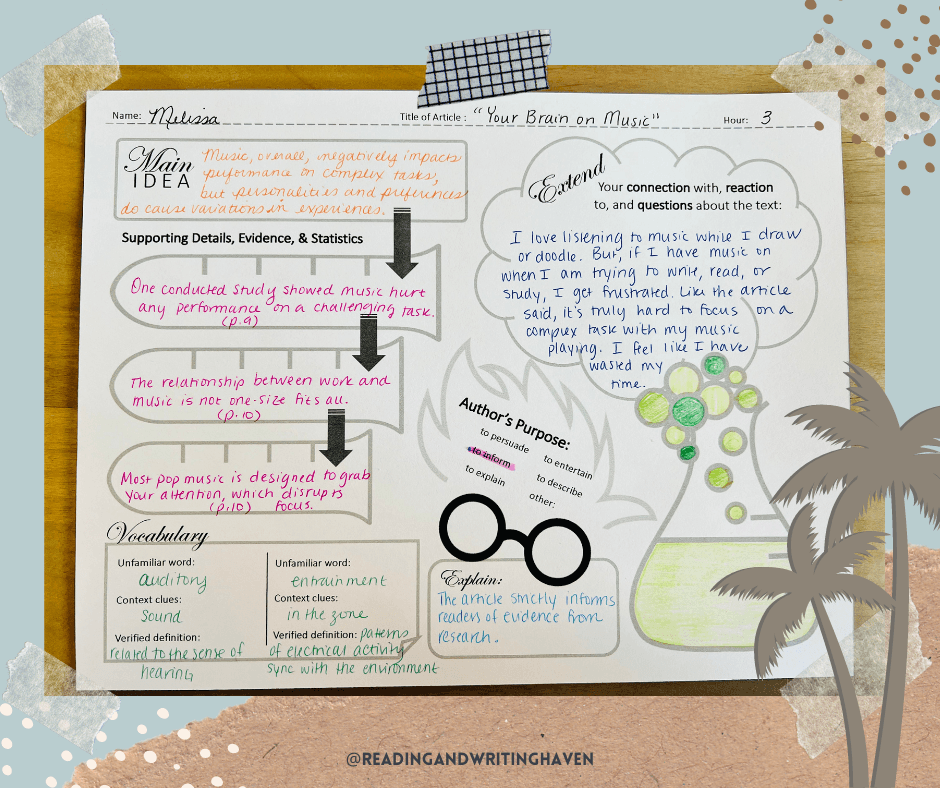
While we know the benefits of graphic organizers, there is a common misconception that students just “know” how to effectively use them. We excitedly pass out what we think is a creative, engaging graphic organizer, only to be disappointed with the results. We wanted full-sentence responses, evidence of critical thinking, and thoughtful connections. (See below.)
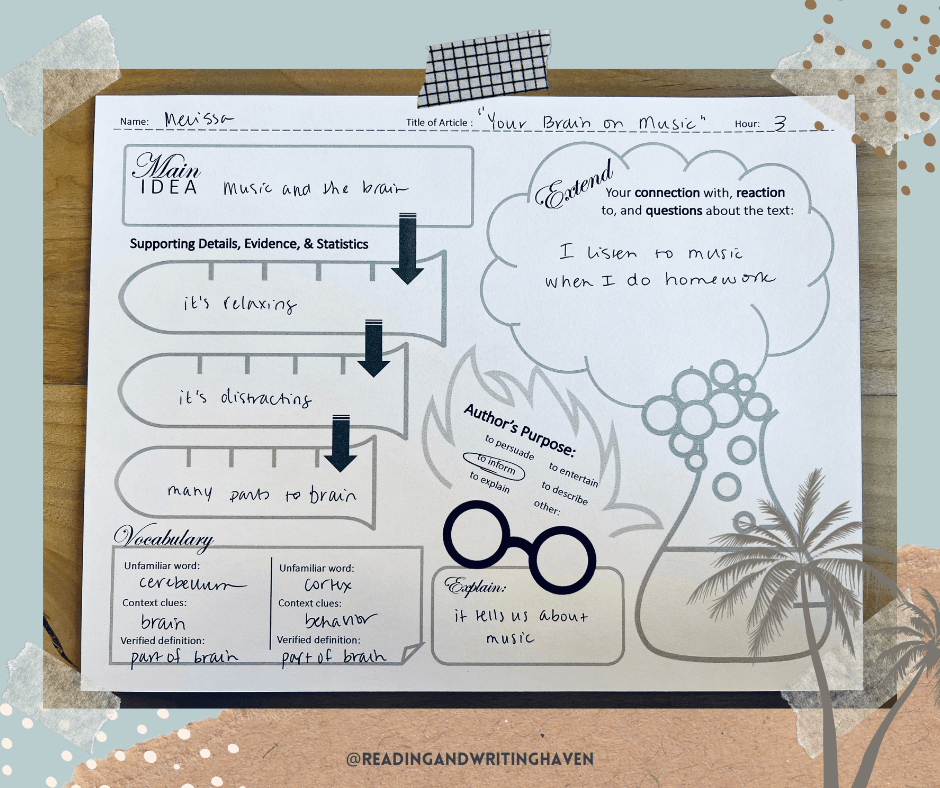
But what we find is a sloppily written one-word response in each box. And, even worse, students didn’t have to engage with the content at all! They simply found a word and filled in the blank.
What gives?
Too often, we give students a graphic organizer and expect them to know what to do. Teaching a lesson to a middle or high school class can be exhausting! It’s tempting to pass out the organizers and go sit down for a break. Eventually, we should be able to do that, but first, we have to model how to use organizers. When we model, students learn more.
A Step-by-Step Process for Modeling with Graphic Organizers
Step 1 – Choose a method.
Like so many things in teaching, if we want students to use graphic organizers authentically, we need to explicitly teach them how to do it! The first step is to choose a way to project your modeling for students. Document cameras, Smartboards, an iPad, an anchor chart, or a whiteboard/chalkboard are all excellent ways of displaying your graphic organizer, so you can model your thinking for students. Below, you can see an example of how an anchor chart could be utilized on the spot during a vocabulary word parts mini lesson.
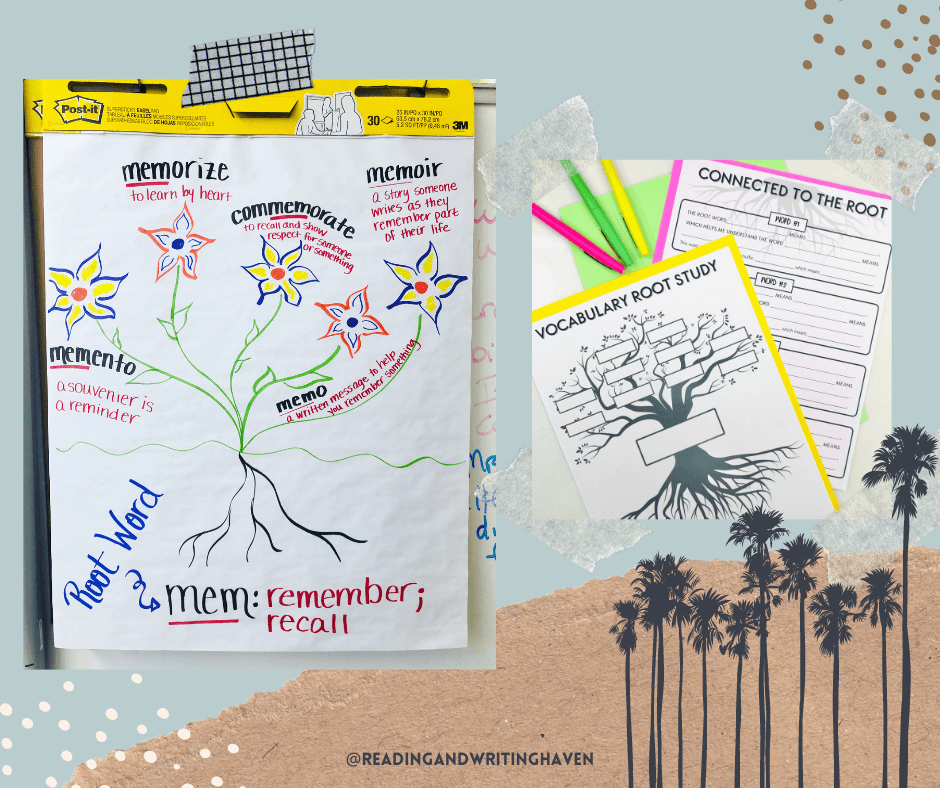
If you want to step up your modeling game even more, provide students with their own version of the anchor chart during the mini lesson. Students can fill out theirs and then have the anchor chart to refer back to later. Not enough wall space? Teaching remotely? Try a digital version and then add the digital anchor chart to your learning management system.
Step 2 – Pick a skill and a text.
Now it is time to pick an anchor text. The best anchor texts are ones you have previously read together or ones that are short, so students can focus on the modeling. “The Great Kapok Tree” by Lynne Cherry is a powerful story about deforestation and the importance of preserving the Amazon Rainforest. This anchor text would be perfect for teaching students about nonfiction text structure by identifying the problem of deforestation, potential solutions, and the consequences of not addressing the issues. We Don’t Eat Our Classmates by Ryan T. Higgins is a story about a dinosaur named Penelope who learns the importance of accepting others. This story could be used to model identifying and explaining character traits or to analyze how character development impacts the theme.
Step 3 – Always model live.
When you are modeling for students, you want to do this together in real time. Showing students your thinking as it is happening is powerful. Projecting a completed example and reading it to students may be faster, but it’s a quick way to lose their attention. Modeling how to use graphic organizers means showing students our process.
Step 4 – Invite them into your thinking.
When modeling for students, it is also helpful to think aloud to demonstrate the thought process behind the writing. Think about the types of questions a student should be asking themselves while completing the graphic organizer. For example, if you are asking students to write about a text with a problem/solution text structure, it may help them to ask questions such as:
- What is the problem the author is identifying?
- What are the suggested or known solutions?
- Which solution is most reasonable?
- What should happen if the solution doesn’t work?
Showing students your thought process models for them that graphic organizers are a tool for thinking deeply, not just busy work!
Step 5 – Make expectations known.
Before you send students off to work on their own, decide how you want the final product to look and communicate that with students. Should students use multiple sentences? Is it important to use complete sentences? Should text evidence be cited? Is it appropriate to include doodling anywhere?
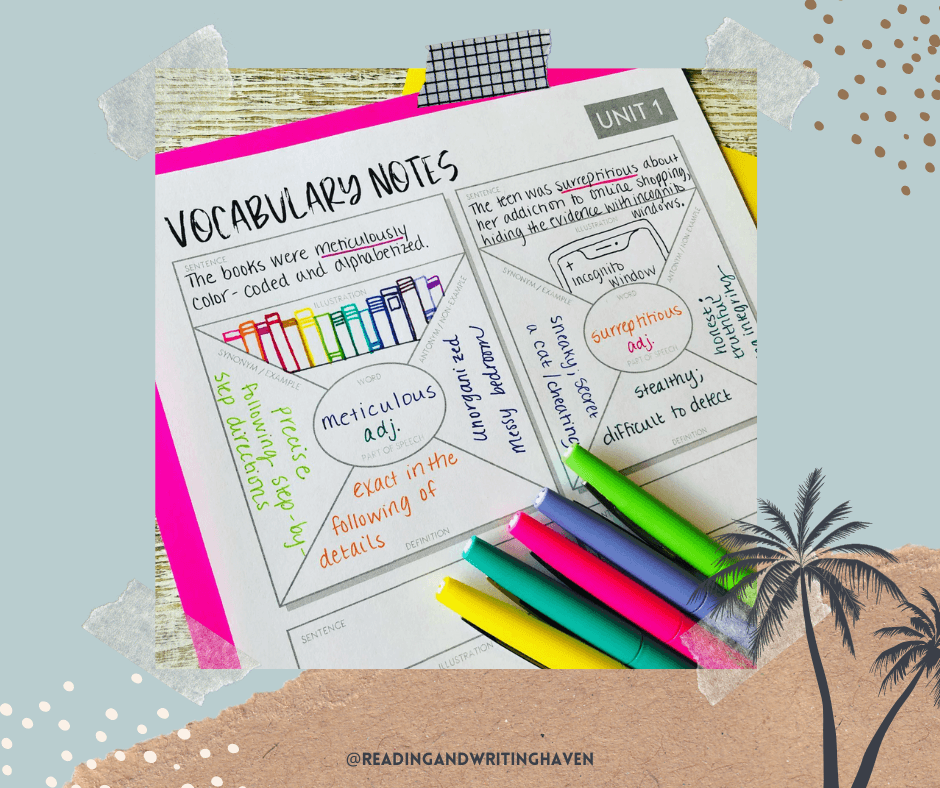
For the Vocabulary Notes image above, I would explicitly model for students that I expect complete example sentences, but fragments are okay for their examples/non-examples and definitions. I would model drawing detailed pictures. The details matter when modeling how to use graphic organizers.
Moving Beyond Modeling
Consider embedding more inconspicuous types of modeling into the graphic organizers as scaffolding for students after the mini lesson. For example, include definitions of new or key terms students may need as scaffolding. Sure, you may have covered these in class, and they also probably have them in their notes! However, the likelihood of students taking the time to access those references is not high if they are focused on finishing the work. So, slide in the definitions as a gentle reminder. This helps to ensure the work they are doing is worthwhile.
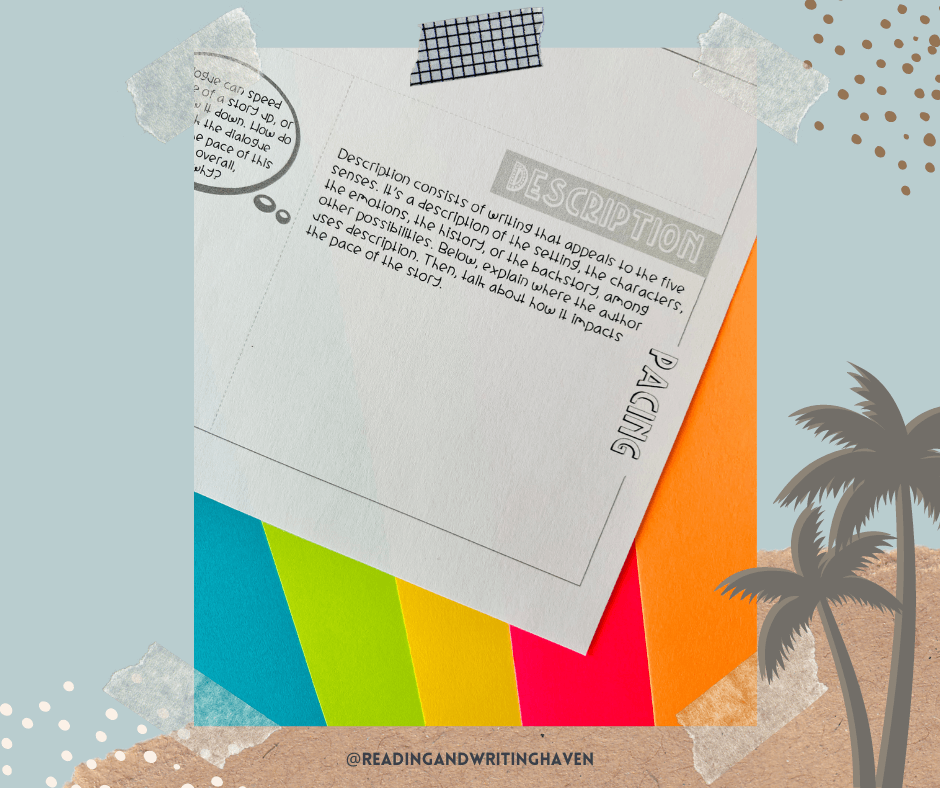
In the example below, students are asked to analyze dialogue, narration, and description elements using a graphic organizer. The organizer includes a definition of description to help them understand pacing, and there are scaffolds in place to support students in becoming more independent.
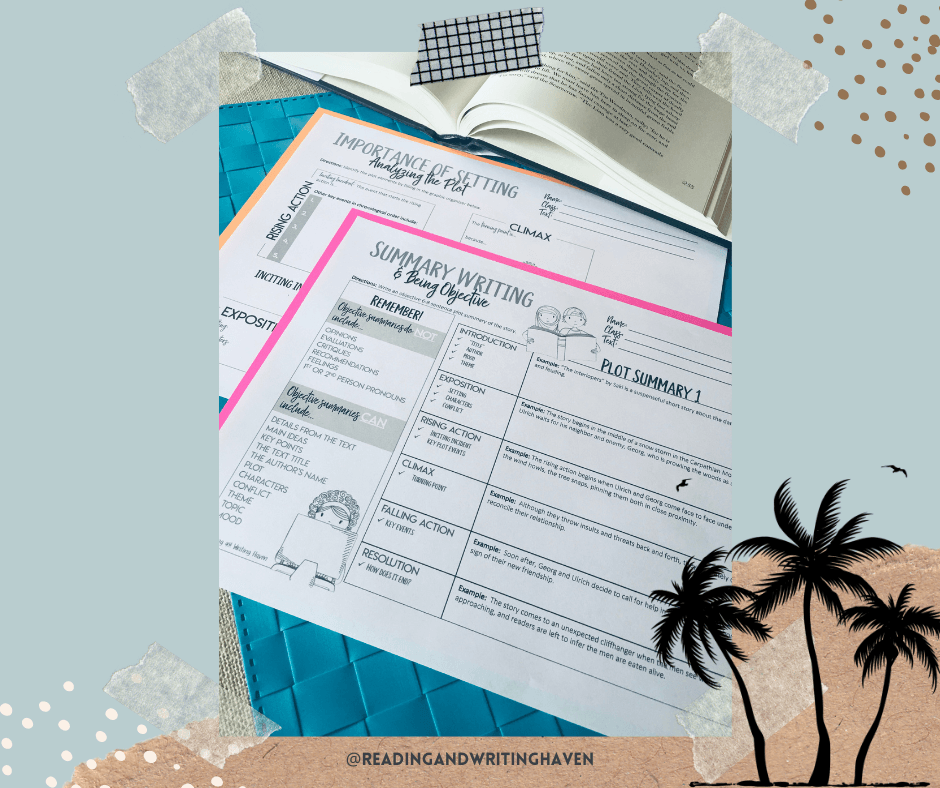
You may also consider including examples from already read texts to jog thinking. See the example below which includes example sentences for summarizing the parts of plot in a story. Students will build confidence as a result of these scaffolds (definitions and examples), which will allow them to complete graphic organizers on their own in the future.
Embracing the Process
Learning is a messy, non-linear process, so it isn’t fair to expect students to make graphic organizers perfect or artistic works that take a lot of time and energy. Students’ energy should be put into thinking critically, making connections, and synthesizing information. I recommend not grading the graphic organizers unless students have had several opportunities to practice using them and have also received feedback on the ones they have already completed. Graphic organizers are about the process, not the product.
So now picture this: You step into your classroom filled with eager middle or high school students, ready for today’s lesson on a challenging topic. You are determined to help your students truly understand and engage with the material. You hand out the graphic organizer you thoughtfully crafted the night before, expecting a breakthrough in comprehension and critical thinking.
And that is exactly what you get! Students are referring to models of the graphic organizer that you created together and posted in the room and on their learning management system. They are thinking about the questions you asked them to consider. They are discussing your think alouds amongst themselves. And as the bell rings to signal the end of class, your students hand in their completed organizers at the door and your heart soars! You are met with complete sentences, genuine engagement, and deep critical thinking. You have unlocked the power of modeling how to use graphic organizers.
Go you!
Note: This is the first post in a series about graphic organizers. Read the second article about visual appeal here!